Click one of the following videos to start play
Histropedia Sheets
Interactive timelines from spreadsheets

Histropedia Sheets allows you to generate a HistropediaJS timeline using a Google Sheets spreadsheet as the data source. The spreadsheet is checked live whenever the timeline is loaded, so will always remain up to date. You can easily collaborate with other editors by managing the access rights for the Google spreadsheet you use.
To create your own timeline, make a copy of this sample spreadsheet and complete the steps on the "instructions" sheet included.
A landing page will be published soon with more detailed instructions. If you need any help in the meantime, contact [email protected] or tweet us @Histropedia.
We'd also love to hear any feedback or feature requests, so don't hold back if you think of anything :)
Exploring the timeline

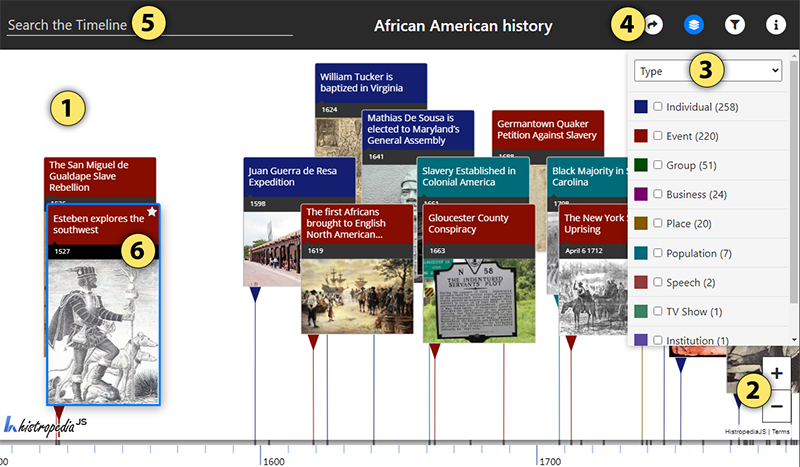
- Scroll back and forward in time by clicking and dragging the timeline left and right. This can be achieved either on the timeline background or on an Event on the timeline as long as you click and drag.
- Zoom in and out of time using the + / - buttons to see more Events on the timeline. You can zoom using the mouse scroll wheel, or the pinching gesture on touch devices.
Notice as you Zoom in more Events can be displayed based on the event ranking (on the timeline axis you will notice many dark marks indicating that there are other events to view). - The Legend feature is displayed by default. This colour codes each of the events on the timeline. You can change the colour coding of Events by selecting a colour code category from the drop down menu at the top of the list. Notice that the timeline can be quickly filtered using the checkboxes for each of the categories. Try changing the colour coding to see Events under different categories.
Note: You can remove the Legend from view by using the Legend toggle button from the Toolbar (4) - The Toolbar allows users to explore the power of the timeline. The Legend has been discussed but here you will also find a more sophisticated Filter (funnel icon) option. By selecting this the Filter window will be displayed allowing the user to select options from the filter categories drop down boxes.
Users can select options from more than one drop down list. The selected filter options will be displayed below the timeline title. You can amend and clear the filter at any time as well as combine its functionality with that of the Legend (3).
The Share button (arrow icon) allows users to share the timeline on social media. This can be combined with any Filter options so you may just share selected data that is of greater interest to you and your followers. If you have a web page or a blog you can also copy and paste the code to embed the timeline. Finally, on the Toolbar you can review the information window and these instructions by selecting the i (information icon). - If you are looking for a specific Event, users can use the Search box by typing in the search value - a list of options will be displayed as you type.
- The Content Panel shows articles, videos and other related content attached to the individual Events on the timeline. Single click on an Event to see a brief description in the Content Panel Preview, located in the top left of the timeline. Click on any of the available Content Tabs at the bottom of the Content Panel Preview to view the content.
A double click on an Event fully opens the Content Panel, with the first available content tab open.